
tl;dr
I changed the application from one class to three with separated responsibilities, wrote some tests and use Travis-CI for continuous integration. Version 0.2.1 is available here.
Since the last post, the application changed a lot. When I had a little time I sat down and just coded. Changes are too small to wrote about separately, but now there are enough of them to do some summary 🙂
The code
Some time ago Photochooser had only one class which was responsible for everything – from selecting the directory, to changing displayed image. It had only about 150 lines of code, so it wasn’t unreadable or something. But when I tried to write tests it was a little inconvenient having mixed logic and presentation layers. So I coded, coded, coded and finally wrote three classes:
– `App` – for everything related to displaying GUI and images. All the code (ok, almost…) related to PyQt is here.
– `ImageManager` – here is implemented logic for loading directory with images and changing them. It’s the only quite well-tested class yet.
– `FileManager` – it’s very simple class loading directory (yeah, here is PyQt) and filtering only *.jpg and *.png images.
It looks very clean right now and I’ll try to maintain it this way.
Tests
My first test checked if the title of application’s window is correct. It wasn’t very good test nor very useful. Now, when I have separated classes I wrote several tests for `ImageManager` and it now looks pretty nice 🙂
But with tests there is always one problem – you must remember about running them! I admit, my memory is rather short (but very good ?). So what can I do…
Of course, use some continuous integration tool!
Travis-CI seems to be perfect here. It’s very nice tool, free for open source projects. Configuration is very easy:
1. login to Travis using your GitHub account
2. enable Travis for chosen repository
3. create simple file `.travis.yml` with configuration
4. see (hopefully) green test after every push ?
You can find more information on Travis documentation. It’s really very easy, my config is only 9 lines long:
language: python
python:
    - "3.5"

install:
    - pip install -r requirements.txt

script:
    - python -m unittest tests/test_app.py
Toolbar
But. Any described changes would be worthless if I hadn’t added some value to my app! So I’ve added a toolbar. It’s very simple version with 3 buttons: left, right and exit. It looks similar to mockups I’ve made before:
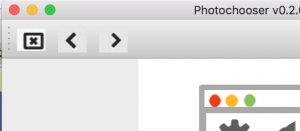
Buttons work of course 😉
Summary
After pretty long time from the last post, I’ve released version 0.2.1 with all described changes. You can find it here. Because the code looks quite nice and clean I’ll continue creating some functionalities. Basic ones seem to be easy – deleting and choosing images, but I don’t want to do it permanently and irreversibly, so I’ll use… something 😀 Check my blog later to find out!
Want more #GetNoticed2017 posts?
- Keep your logs short with logrotate
- Photochooser – version 0.2.1 released!
- About getting out of the comfort zone
- First tests in Python! #GetNoticed2017
- Photochooser – mockups! #GetNoticed2017
- Photochooser – one step back #GetNoticed2017
- Photochooser – the starting point #GetNoticed2017
- Daj Się Poznać 2017 (Get Noticed 2017)
Leave a Reply