
This is a simple tutorial how to set up Selenium test with PHPUnit and phantomjs for easy and fast testing.
Today I wanted to learn something about Selenium. It’s very popular testing tool for any application that can be launched using a web browser, regardless of programming language or technology. I don’t know it very much, in fact, I know only how to set it up and write the simplest test 😉 But I want to share my today’s experiences because I cannot find any simple tutorial and had to glue together scripts, setting and libraries from all across the internet 😉
If you don’t like reading tutorials and want rather dig into example code I created the repository on GitHub where you can find everything I talk about here.
PHPUnit
First of all, you need PHPUnit. I used versions 4.8.18 and 5.7.13 and it works with both. I added PHPUnit to my repository’s composer.json just for simplicity, you can use any version and any destination you want, it doesn’t matter.
Selenium webdriver
Next, you need `facebook/webdriver`. It’s the package from facebook containing PHP client for Selenium webdriver. It’s hight rated and widely used package and it’s well maintained – at the moment the last commit was created 4 days ago 🙂 To install it you should execute composer require –dev facebook/webdriver (you can omit `–dev` option but I think it’s good to separate packages for dev and prod environments)
phantomjs
The last thing you need is a browser. You can use Selenium with Firefox, Chrome and a couple more browsers. I tried it with Firefox and it works ok but slow. And needed some additional binary installed. I was wondering how will it work in Travis-CI, continuous integration service we’re using in my company. Running browser feels kinda weird. Hopefully I found in Travis documentation that Selenium can be used with phantomjs – “[…] a headless WebKit scriptable with a JavaScript API.” as stands in the official website 😉
I gave it a try and… it was perfect! Before, in Firefox, tests run about 8 seconds but in phantomjs only 2 seconds!
So in my repository I installed phantomjs using `npm`, also only for `dev` environment: npm install –save-dev phantomjs . You can of course install it globally (just omit `–save-dev` option) and use it that way – it doesn’t matter, I added phantomjs to repository just for simplicity, like with PHPUnit.
Let’s write some code
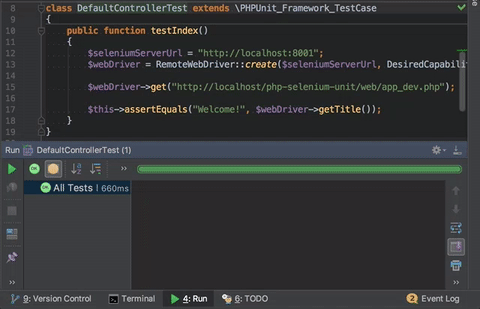
Now it’s finally time to create some test! I created new directory for Selenium tests and added new class: `tests/Selenium/AppBundle/Controller/DefaultControllerTest.php`. In my project I use Symfony app so I have default controller displaying some details about Symfony installation. I use it in my test so I don’t have to create controllers, templates, routes and etc.
In my test I want to check if the index page of my application is titled as `Welcome!`. To do so write something like this:
    public function testIndex()
    {
        $seleniumServerUrl = "http://localhost:8001";
        $webDriver = RemoteWebDriver::create($seleniumServerUrl, DesiredCapabilities::phantomjs());

        $webDriver->get("http://localhost/php-selenium-unit/web/app_dev.php");

        $this->assertEquals("Welcome!", $webDriver->getTitle());
    }
In the first line I specify Selenium server URL – phantomjs server will be running on that URL. Then I create `RemoteWebDriver` instance using that URL and specify server type as phantomjs.
And thats all configuration you have to specify, really 🙂 With just two lines of configuration’s code you can write tests using Selenium!
To test the page I tell webdriver to go to Symfony’s index URL and then check with PHPUnit assertion if page’s title is equal to `Welcome!`.
Running the test
To run this test you must run phantomjs server first. For now I do it manually but I want to automate this later. For now just run it manually too 😉
Running phantomjs is simple, just execute phantomjs –webdriver=8001 (in my case node_modules/.bin/phantomjs –webdriver=8001 ). In webdriver option I specify port for server’s URL, the same as specified in `$seleniumServerUrl`.
It’s time to run the test 😉 I’m using PHPStorm IDE and run it from there but you can run it as you want, using console for example. I run it like this (note “Updating PHPUnit version” popup – its weird PHPStorm bug waiting for fix…)
Summary
That’s all folks! Simple Selenium test using only two lines of configuration code, fast “browser” and PHPUnit. Hope I’ll be helpful for you 🙂 Expect more posts about testing in near future!
Want more tech meat?
- Few words about refactoring. And elephants
- Train of thought about technical debt
- About testing features
- Arrow functions in PHP
- Self code review?
- Handy PhpStorm shortcuts that make your life easier
- Adding a new Logger to Laravel
- [Edit] How to deploy Symfony app with Capistrano 3 on cheap OVH VPS
- How to make cool progressbar in Symfony command?
- Using PHP5.6 and PHP7.1 at the same time on OS X!
Leave a Reply